Desktop Version
Two versions of the parcel assessment tool are available; a desktop version to be used when the parcel boundaries are known, and a web version for quickly estimating the benefits based on the quarter-quarter section (approximately 40 acres) nearest to the provided address or coordinates. The desktop version produces a report based on the actual parcel boundaries provided by the user, and is the preferred version when a shapefile of the parcel boundaries is available. Users that want to score many parcels at once can do so using the desktop version batch mode. The desktop version comes with the required base data, and runs on Microsoft Windows.
Getting started
- Download (note the file size is 2.4gb due to the included base data)
- Unzip the file (this may take some time and requires 12gb of space)
- Double click ‘Run’
- Review the user guide for more information

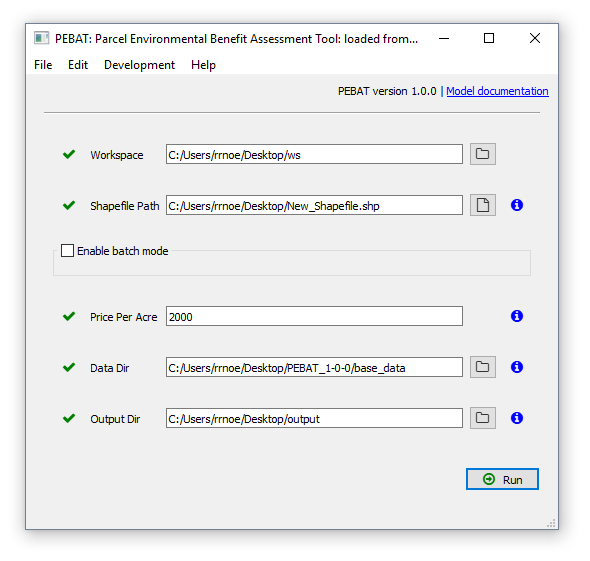
- Workspace: Where temporary files the tool generates as it runs are stored. It can be any folder on your computer and can be deleted when complete. This can be left as the default value.
- Shapefile Path: The path to the shapefile of your proposed parcel. Click the button to the right of this field to navigate to the file ending in .shp. The shapefile coordinate system must be either UTM 15N or WGS 1984. The tool will calculate the average score of all of the features in the shapefile, so make sure that only the features of the proposed acquisition are included. See the user guide for more information on creating shapefiles.
- Enable Batch Mode: Check this box if you want to generate reports for multiple parcels. To use this mode, put all of the shapefiles–one proposed acquisition per file–into one folder and select that folder. Shapefile Path is ignored when batch mode is enabled, and only one price per acre can be set.
- Price per acre: Divide estimated total cost of project (including closing costs) by the size of the acquisition in acres. This is compared to the total project cost per acre (including contributions by other organizations) of past LCCMR-funded easements.
- Data Dir: The folder of base data that comes with the tool. This can be left as the default value unless you move the base data, or it is not found. In that case, navigate to the location of the base data and select the ‘base_data’ folder.
- Output Dir: The folder where the reports will be saved. Select any folder you wish.